Posts Taged quickbooks-online

Using Window Envelopes with QuickBooks Online

The following is a quick guide on how to set up the use of window envelopes in QuickBooks Online.

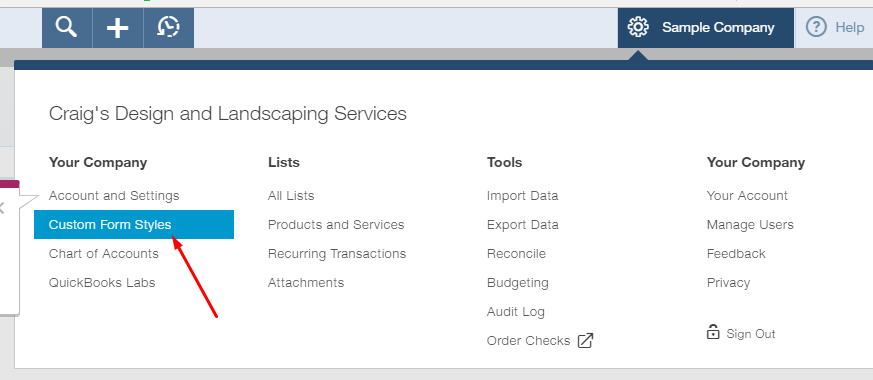
  1. Go to the Custom Form Styles List. Do this by clicking the Gear Icon and under the Your Company Column you will find the Custom Form Styles Link.


customformstylesscreenshot1

  1. In the list window, you can choose to edit an existing form template or create a new one using the New Style button on the top right hand side.
  2. Currently there are five layout templates that Intuit allows you to choose from. Three of them are window envelop compatible (Airy, Modern, Friendly) and two are not (Fresh, Bold). Choose a compatible template you would like to use.
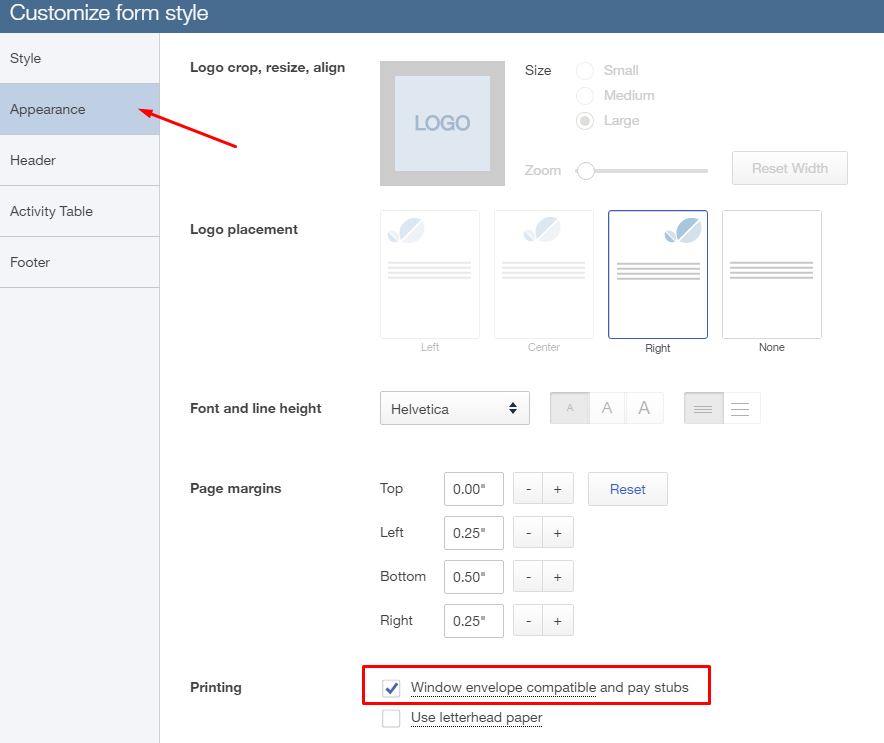
  3. Finally, in the Appearance tab, make sure the Window Envelope Compatible Box is checked.customformstylesscreenshot2


QuickBooks Online Keyboard Shortcuts – Free Reference Guide

This is a quick blog post I wanted to make sharing a reference guide I created for the keyboard shortcuts available to users of QuickBooks Online. These are time saving shortcuts that enhance the usability of QBO. In my experience, anytime I can minimize the use of a mouse I become more efficient. Please feel free to print out the guide and hang it near your work space (that is what I do, by the way). I hope you are enjoying your day and I am looking forward to providing more great content in the future. Have a nice weekend!

Click the following link for a PDF version of the guide that you can print and share.

QUICKBOOKS ONLINE KEYBOARD SHORTCUTS


QuickBooks Online Tutorial – How to apply discounts

The following is a brief video showing how to turn on discounts for your sales forms (invoices, estimates, sales receipts, etc) in the new QuickBooks Online. As always, if you have any questions please don’t hesitate to contact us.

How to enter your own invoice number in QuickBooks Online – QBO Tutorial

The following instructions are for setting up your QuickBooks Online Company file to allow you to enter you own invoice numbers. I also recorded a brief video showing how to change the company settings step by step.

  1. Click on the Company Gear Icon in the upper right hand corner.
  2. Click “Company Setting” under Setting
  3. Select “Sales Form Entry” on the left hand side of the screen
  4. Check the box that is labeled “Custom transaction number”
  5. Click “Save” to save your settings.

Now your QuickBooks Online company file will be set up to allow you to enter your own invoice number.  If you have any questions or comments please feel free to enter them below. Also make sure to subscribe to my Blog for more tips and useful information I will be publishing soon.

Thank you for reading and have a wonderful day!

How to Handle a returned Check in QuickBooks Online

This is a brief instructional post on how to record bounced checks in QuickBooks Online. This method can also be applied to Desktop versions of QuickBooks.  Embedded below is also the video version of these instructions including a run through of the entire sales cycle.

  1. Create a product or service in your item list called “returned check”, the income account is going to be the bank account that the check bounced from. This item is going to be used in creating a new invoice for the bounced funds.
  2. If you are going to want to invoice for Returned Check charges by the bank,  you are going to want to create another item in your product/service list called NSF Fees. You can use an existing income account or create a new income account if you want to track NSF fees invoiced to customers.
  3. Create a new invoice to the customer whose check bounced. The first item on the invoice is going to be the item created in Step 1 and you want to enter a description of the returned check and the amount of the returned check.
  4. The second item on the invoice is going to be the item created in Step 2. Enter the amount you are going to be charging as an NSF fee.
  5. Now your invoice total should add up to the amount of the bounced check plus the amount charged for the NSF Fees.  Save and send the new invoice to the customer.

The result will be the deduction of the bounced check from the bank account and a new invoice in accounts receivable for the amount still owed in addition to the new charge for NSF fees.  This is the proper way to handle bounced checks in QuickBooks Online.

As always please feel free to comment and ask questions. Subscribe to my blog and YouTube channel for more informative posts in the near future. Thank you.

How to account for customer deposits using QuickBooks Online – QuickBooks Online Tutorial

This is a quick blog post describing how to account for customer deposits in QuickBooks. I have also made a YouTube video showing step by step instructions, followed by a example of accepting a customer deposit and later on invoicing that same customer.

Instructions for accepting a customer deposit

  1. Set up a new “Other Current Liabilities” account in your company file’s chart of accounts called “Customer Deposits.”
  2. Create a new product/service item in your item list called “Customer Deposit,” the income account associated with this item will be the Other current liability account we created in step 1.
  3. Accept a deposit from the customer or client using the Sales Receipt option under your customer center.
  4. Continue to filling out the sales receipt as usual and when choosing an item, choose the Customer Deposit item and input the amount of the deposit.

As always, if you have any questions or need any assistance please feel free to contact us at 954-358-9487 or fill the contact form below to have us contact you. I hope you have a wonderful day!