QuickBooks

How to run a profit per invoice returns in QuickBooks

In this video, I demonstrate how to extract data from QuickBooks into Microsoft Excel and produce reports such as a Profit per Invoice report. I also show you that once the data is in Excel, you can produce many useful reports, such as gross profit per product, gross profit per customer and more. This is also a video that can serve as a primer into using pivot tables.

If you have any questions, please feel free to leave them in the comments below. Thank you and have a nice day!
 

Customized Accounting Reports Emailed Automatically – QuickBooks Online Tutorial

This is a new video I published demonstrating one of my favorite features in QuickBooks Online, the automated sending of accounting reports. This feature is such a powerful tool when combined with accurate and up to date accounting records. I hope you find this video helpful.

Using the new Bundle Feature in QuickBooks Online – Video Tutorial QuickBooks Online

This is a new video I published today demonstrating how to use the new Bundle feature to create Group items for creating a list of commonly used items on Invoices, Sales Receipts, Estimates and Bills. This feature is very useful in a variety of business processes. How would you use this in your business? We  would love to know, please leave a comment below. Thank you and have a nice day!
Using Window Envelopes with QuickBooks Online

The following is a quick guide on how to set up the use of window envelopes in QuickBooks Online.

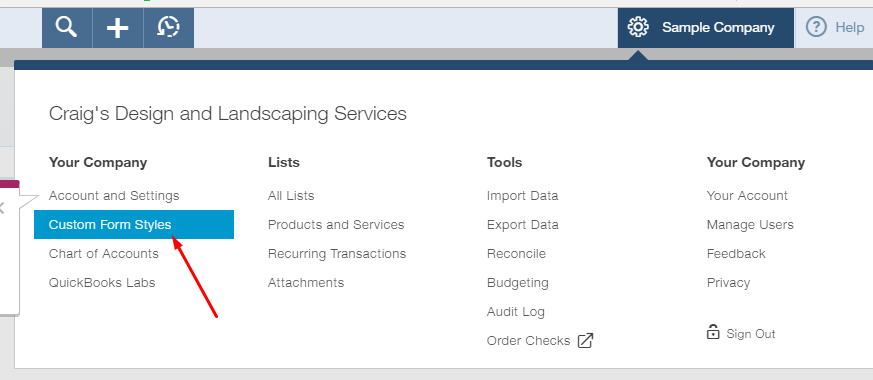
  1. Go to the Custom Form Styles List. Do this by clicking the Gear Icon and under the Your Company Column you will find the Custom Form Styles Link.


customformstylesscreenshot1

  1. In the list window, you can choose to edit an existing form template or create a new one using the New Style button on the top right hand side.
  2. Currently there are five layout templates that Intuit allows you to choose from. Three of them are window envelop compatible (Airy, Modern, Friendly) and two are not (Fresh, Bold). Choose a compatible template you would like to use.
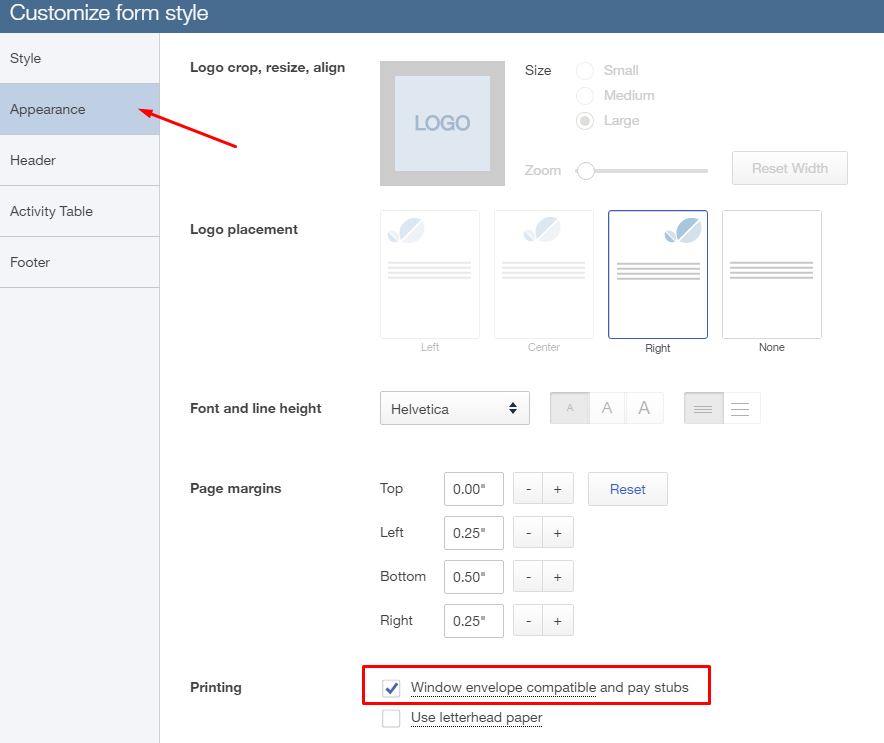
  3. Finally, in the Appearance tab, make sure the Window Envelope Compatible Box is checked.customformstylesscreenshot2


Too many accounts on your chart of accounts – QuickBooks Online

I am going to be launching a new series of articles that is set to help business owners and accounting professionals get more out of their financials. In this series I will identify common mistakes that I see and how to resolve the situation.  In our demonstrations we will be using QuickBooks online for our accounting software but the theory and concepts would apply to any accounting software. Let’s get started!

One extremely common error I see is the utilization of too many accounts in the company’s chart of accounts. For a brief overview of the chart of accounts, watch our YouTube video “What is the Chart of Accounts?” (https://www.youtube.com/watch?v=FGDrkBtcqV4)

Having too many accounts on your chart of accounts can actually hinder the amount of information provided by the Profit and Loss and Balance Sheet. For example, when analyzing financial statements you often want to perform trend analysis, in other words look for increases, decreases or baseline for certain items. But this can be extremely difficult if there are too many accounts since there is an increased chance of the same expense appearing in two separate accounts.

There are a number of different solutions to resolve this problem, as outlined below.

Delete the Account

The first option would be to delete unnecessary accounts. Don’t worry deleting an account will NOT delete all of the previous transactions that used that account. In fact it will not even actually delete the account (even though it is labelled that way in QBO). What QuickBooks actually does when you delete an account is make the account inactive, which will eliminate that account as an option in future transactions.

Use Sub-accounts 

The option on our road to clear and concise books is the utilization of sub accounts. A sub account is used when you want to break down a general account into more detailed accounts. For example, we can have a general (aka Parent) account “Auto Expenses” with sub accounts “Lease payments”, “Fuel” and “Maintenance”. Note, when you are using sub accounts correctly you should never be categorizing any transactions into the Parent account, all transactions should be coded to the sub account. The beauty in using sub accounts is the option to expand or collapse the accounts on any report that includes them. So continuing with the above example of Auto Expenses, we can choose on the fly whether we wish to see total auto expenses or a break down of the sub accounts whenever we run a report.

Merge Accounts

The last option is to merge accounts. This option should be used if there are two or more accounts that basically consist of the same type of transaction. In this case there is no need to have the transactions in separate accounts, in fact they should be in the same account to better track trends and project them over time. An example would be if you have an account for Cell Phone Expense and a separate account for Telephone Expense. You can really just merge these two accounts into one account called Communications Expense or Phone Expense etc. To merge accounts, you need to edit the account from you chart of accounts and change the name and detail type of one account to the information of the account you are trying to merge it with. This will change all of the previous or historic transactions. Warning, once two accounts are merged you cannot reverse or unmerge them.

QuickBooks Online Desktop Application – Initial Review

Hello everyone!

Recently released is a Windows Desktop application that allows you to access your QuickBooks Online Company file on your desktop. You will still need an internet connection and an active company file. The application is free to download, I will post a link to the Intuit Blog which describes the application in more detail and has a download link. The application is free to download and I strongly encourage QBO users to try out the application.

The benefits of using the desktop application rather that using an internet browser really boils down to ease of use and convenience. I personally noticed an improvement in speed while using the application versus the browser. Also those of you that are accustomed to using the tradition Desktop versions of QuickBooks (Pro, Premier and Enterprise) will be happy to be able to use the drop down menus to access your reports, transactions and other common areas in QBO.

The following is a link to the blog post and download link.

http://quickbooks.intuit.com/blog/the-quickbooks-windows-app-is-here/

Marking an Invoice as Pending and Removing the Pending Status Stamp


There may be times where you want to issue an invoice to a customer, but do not want to recognize the revenue because you have not yet earned the revenue. According to generally accepted accounting principles, you should recognize revenue when it is earned if you are doing accrual basis accounting. Marking the invoice as pending will save the invoice for you to finalize in the future and will NOT record any accounting in the background (will not record sales or a receivable).

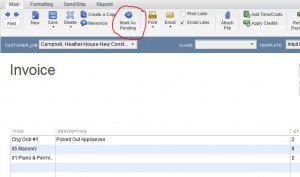
To mark an invoice as pending, fill out the invoice fields as usual then click the Mark as Pending button shown in the image below.

markpending


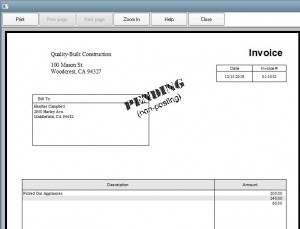
If you preview the invoice, after marking it as pending, you will notice that it has a Pending Status Stamp on the invoice (see image below).

Pendingstamp


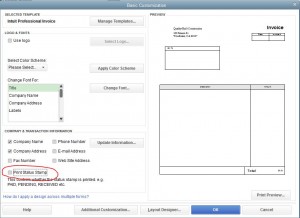
If you wish to remove this stamp, you will need to edit the template. You do this by clicking the lists menu then choosing templates from the top menu bar. Then you select the template you want to edit and right click it and choose edit template. In the Basic Customization window shown below, make sure to uncheck the box labeled Print Status Stamp.

PrintStatusSetting


Click OK to save the change to the template and now your pending invoices will print without the Pending Status stamp.

If you have any questions please feel free to leave them in the comments below this post. Thank you for reading and have a nice day!

Job List in QuickBooks Desktop – Report Customization

I was having a consulting session with one of my clients and they wanted to know how to get a list of jobs out of QuickBooks Desktop. There doesn’t exist a default report that will give you a list of jobs in QuickBooks, but using some advanced customization options you are able to get a detailed job list.

The first step in our customization will be to start with the default Customer Contact List.
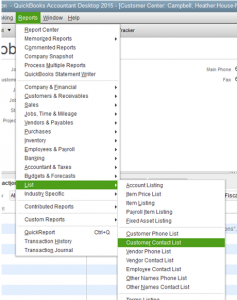
Reports>List>Customer Contact List
CustomerContactList


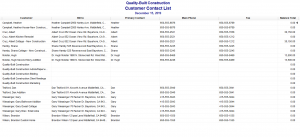
You end up with the following report that shows all of your customers and jobs.

CustomerContactList2


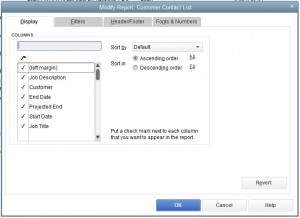
From here we made a few key customization changes to come up with the report we wanted. Click the Customize Report button and select the columns you want to see.  In our case, we wanted to see the job description, the customer, start date, projected and actual end date. (see the following image)Columns


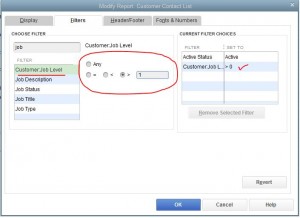
Next, I wanted to filter the report so that it only shows Jobs. I did this by including the Customer:Job Level filter. I filtered for the level to be greater than one.

JobFilter


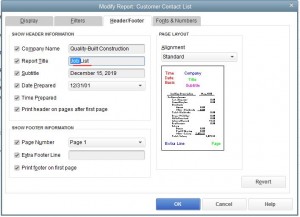
Finally, I changed the header to reflect that this is a Job List.

JobListHeader


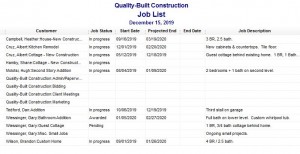
The result was a nice Job List report with meaningful information that the client can memorize for future use.

JobListReport


QuickBooks Online Keyboard Shortcuts – Free Reference Guide

This is a quick blog post I wanted to make sharing a reference guide I created for the keyboard shortcuts available to users of QuickBooks Online. These are time saving shortcuts that enhance the usability of QBO. In my experience, anytime I can minimize the use of a mouse I become more efficient. Please feel free to print out the guide and hang it near your work space (that is what I do, by the way). I hope you are enjoying your day and I am looking forward to providing more great content in the future. Have a nice weekend!

Click the following link for a PDF version of the guide that you can print and share.

QUICKBOOKS ONLINE KEYBOARD SHORTCUTS


How to account for inventory shipping costs in QuickBooks

According to generally accepted accounting principles, the value of inventory is any and all costs incurred to get the product ready for sale. This includes any costs associated with receiving the product, including shipping fees (also known as inbound freight). When you add the shipping costs to inventory, the process is referred to as capitalization and it gives you a better representation of cost of goods sold.

Let’s take a look at a brief example of how to account for shipping costs. Assume you own a retail business that buys and resells widgets. You buy the widgets from your supplier at a cost of $5.00 each. You order 100 widgets and are charged $500.00 plus $50.00 for shipping the widgets to your warehouse. The average inventory valuation cost for each widget should no longer be just $5.00, it should be $5.50 in order to reflect the additional cost to get the items ready for resale (100 widgets purchased for $500 plus $50 for shipping).

Now let’s see how this example should be handled in QuickBooks Pro and Premier.

There are two different methods of accounting for this depending on how you are billed for the shipping costs.

If you are billed for the shipping by your supplier on the invoice for the widgets then just distribute the shipping costs between the items purchases. In the example above we would simply add the $50.00 to the amount we paid for the 100 widgets.
If you are billed separately through a third party vendor, there are a few extra steps in order to account for these costs properly.

First you would enter the invoice from your supplier for the widgets purchased. After you do this your inventory valuation per item in the above example will be $5.00.

The next step would be to create an expense account in your chart of accounts called “Clearing Shipping Expense”. When you receive the bill for the shipping expense from the third party, you will enter the $50 into this Clearing Shipping Expense Account.

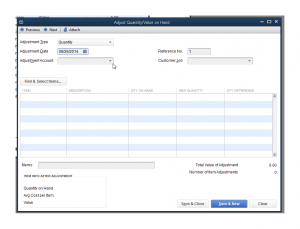
The last step will be to adjust to inventory valuation. You do this in QuickBooks 2014 by clicking Vendors>Inventory Activities>Adjust Quantity/Value on Hand.


Inventory Valuation Adjustment Menu

Inventory Valuation Adjustment Menu


Then make the Adjustment Type – Total Value. The adjustment date will be the date in which you received the inventory. The adjustment account will be the Clearing Shipping Expense Account you created in the previous step. The next step would be to select the inventory item that needs to be adjusted, widgets in our example. Then add the Total Value plus the Shipping Cost as the new value. This will make the average cost of the inventory equal to the original cost of the inventory plus the cost of the shipping.

Note that this method works with QuickBooks Pro and Premier because these versions use an average cost inventory valuation method. If you are using FIFO (first in first out) inventory valuation methods then this will not work because we are changing the valuation of the entire inventory account for that product and not just the last items that were ordered.


Inventory Adjustment Menu

Inventory Adjustment Menu


If you followed the steps correctly, your new inventory valuation would be $5.50 (in the example above) and the balance in the clearing shipping expense account will be $0.

Another alternative that would work with all inventory valuation methods would be to enter the invoice for the widgets and allocate the cost of the inbound shipping to the item costs (increasing the item cost so that it is the original cost owed to the supplier plus a portion of the shipping costs). Then in the expense tab you would enter a negative number for the amount of the shipping that you just allocated to the individual items on the item tab and the expense account you will use is the expense clearing account. Then you would record the third party shipping invoice to the same expense clearing account to zero out the account.

Following these directions will capitalize your shipping costs making your gross margin more accurate and in line with what is actually happening in your operations.

If you have any questions please feel free to leave a comment below.

Thank you for your time and subscribe to this blog to receive notifications for new posts I will be releasing.