Blog

QuickBooks Online Keyboard Shortcuts – Free Reference Guide

This is a quick blog post I wanted to make sharing a reference guide I created for the keyboard shortcuts available to users of QuickBooks Online. These are time saving shortcuts that enhance the usability of QBO. In my experience, anytime I can minimize the use of a mouse I become more efficient. Please feel free to print out the guide and hang it near your work space (that is what I do, by the way). I hope you are enjoying your day and I am looking forward to providing more great content in the future. Have a nice weekend!

Click the following link for a PDF version of the guide that you can print and share.

QUICKBOOKS ONLINE KEYBOARD SHORTCUTS


Inventory Turnover Ratio – Financial Statement Analysis

This is a new video series I am producing showing viewers how to read and analyze financial statements. In this installment, I introduce the inventory turnover ratio. I show how to calculate and discuss what the ratio indicates about your business or the company you are analyzing.

Below is the video. Subscribe to this blog and our YouTube channel for up to date reminders of our newest content.


How to account for inventory shipping costs in QuickBooks

According to generally accepted accounting principles, the value of inventory is any and all costs incurred to get the product ready for sale. This includes any costs associated with receiving the product, including shipping fees (also known as inbound freight). When you add the shipping costs to inventory, the process is referred to as capitalization and it gives you a better representation of cost of goods sold.

Let’s take a look at a brief example of how to account for shipping costs. Assume you own a retail business that buys and resells widgets. You buy the widgets from your supplier at a cost of $5.00 each. You order 100 widgets and are charged $500.00 plus $50.00 for shipping the widgets to your warehouse. The average inventory valuation cost for each widget should no longer be just $5.00, it should be $5.50 in order to reflect the additional cost to get the items ready for resale (100 widgets purchased for $500 plus $50 for shipping).

Now let’s see how this example should be handled in QuickBooks Pro and Premier.

There are two different methods of accounting for this depending on how you are billed for the shipping costs.

If you are billed for the shipping by your supplier on the invoice for the widgets then just distribute the shipping costs between the items purchases. In the example above we would simply add the $50.00 to the amount we paid for the 100 widgets.
If you are billed separately through a third party vendor, there are a few extra steps in order to account for these costs properly.

First you would enter the invoice from your supplier for the widgets purchased. After you do this your inventory valuation per item in the above example will be $5.00.

The next step would be to create an expense account in your chart of accounts called “Clearing Shipping Expense”. When you receive the bill for the shipping expense from the third party, you will enter the $50 into this Clearing Shipping Expense Account.

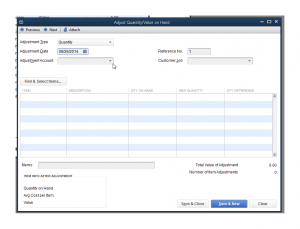
The last step will be to adjust to inventory valuation. You do this in QuickBooks 2014 by clicking Vendors>Inventory Activities>Adjust Quantity/Value on Hand.


Inventory Valuation Adjustment Menu

Inventory Valuation Adjustment Menu


Then make the Adjustment Type – Total Value. The adjustment date will be the date in which you received the inventory. The adjustment account will be the Clearing Shipping Expense Account you created in the previous step. The next step would be to select the inventory item that needs to be adjusted, widgets in our example. Then add the Total Value plus the Shipping Cost as the new value. This will make the average cost of the inventory equal to the original cost of the inventory plus the cost of the shipping.

Note that this method works with QuickBooks Pro and Premier because these versions use an average cost inventory valuation method. If you are using FIFO (first in first out) inventory valuation methods then this will not work because we are changing the valuation of the entire inventory account for that product and not just the last items that were ordered.


Inventory Adjustment Menu

Inventory Adjustment Menu


If you followed the steps correctly, your new inventory valuation would be $5.50 (in the example above) and the balance in the clearing shipping expense account will be $0.

Another alternative that would work with all inventory valuation methods would be to enter the invoice for the widgets and allocate the cost of the inbound shipping to the item costs (increasing the item cost so that it is the original cost owed to the supplier plus a portion of the shipping costs). Then in the expense tab you would enter a negative number for the amount of the shipping that you just allocated to the individual items on the item tab and the expense account you will use is the expense clearing account. Then you would record the third party shipping invoice to the same expense clearing account to zero out the account.

Following these directions will capitalize your shipping costs making your gross margin more accurate and in line with what is actually happening in your operations.

If you have any questions please feel free to leave a comment below.

Thank you for your time and subscribe to this blog to receive notifications for new posts I will be releasing.

How does QuickBooks Calculate Cost of Goods Sold? Average Cost Valuation

In this blog post I wanted to discuss how QuickBooks calculates cost of goods sold. There are several accounting methods for inventory valuation, but the one QuickBooks uses is called the Average Cost Valuation Method. Let’s look at a brief example.

Let’s assume we sell widgets and decide to purchase 100 widgets for $1.00 each.

Our Inventory Account will have a balance of $100

Next month we purchase 100 of the same product for $1.50 each.

Our Inventory Account will now have a balance of $250. (The $100 prior balance plus the $150 we just purchased)

Behind the scenes QuickBooks will calculate the cost of each product as $1.25 because this is the average price we paid for this specific widget ($250 Inventory Balance divided by the 200 widgets that we have on hand)

Next time you sell a widget, QuickBooks will add $1.25 for each widget sold into the Cost of Goods Sold account as an expense.

I made the video below showing an example of this in QuickBooks.

If you have any additional questions, please feel free to ask them in the comments below.

QuickBooks Online Tutorial – How to apply discounts

The following is a brief video showing how to turn on discounts for your sales forms (invoices, estimates, sales receipts, etc) in the new QuickBooks Online. As always, if you have any questions please don’t hesitate to contact us.

How to enter your own invoice number in QuickBooks Online – QBO Tutorial

The following instructions are for setting up your QuickBooks Online Company file to allow you to enter you own invoice numbers. I also recorded a brief video showing how to change the company settings step by step.

  1. Click on the Company Gear Icon in the upper right hand corner.
  2. Click “Company Setting” under Setting
  3. Select “Sales Form Entry” on the left hand side of the screen
  4. Check the box that is labeled “Custom transaction number”
  5. Click “Save” to save your settings.

Now your QuickBooks Online company file will be set up to allow you to enter your own invoice number.  If you have any questions or comments please feel free to enter them below. Also make sure to subscribe to my Blog for more tips and useful information I will be publishing soon.

Thank you for reading and have a wonderful day!

How to Handle a returned Check in QuickBooks Online

This is a brief instructional post on how to record bounced checks in QuickBooks Online. This method can also be applied to Desktop versions of QuickBooks.  Embedded below is also the video version of these instructions including a run through of the entire sales cycle.

  1. Create a product or service in your item list called “returned check”, the income account is going to be the bank account that the check bounced from. This item is going to be used in creating a new invoice for the bounced funds.
  2. If you are going to want to invoice for Returned Check charges by the bank,  you are going to want to create another item in your product/service list called NSF Fees. You can use an existing income account or create a new income account if you want to track NSF fees invoiced to customers.
  3. Create a new invoice to the customer whose check bounced. The first item on the invoice is going to be the item created in Step 1 and you want to enter a description of the returned check and the amount of the returned check.
  4. The second item on the invoice is going to be the item created in Step 2. Enter the amount you are going to be charging as an NSF fee.
  5. Now your invoice total should add up to the amount of the bounced check plus the amount charged for the NSF Fees.  Save and send the new invoice to the customer.

The result will be the deduction of the bounced check from the bank account and a new invoice in accounts receivable for the amount still owed in addition to the new charge for NSF fees.  This is the proper way to handle bounced checks in QuickBooks Online.

As always please feel free to comment and ask questions. Subscribe to my blog and YouTube channel for more informative posts in the near future. Thank you.

The Importance of Strategic Planning in Business

Strategic Planning Graph

Graph Strategic Planning

There are so many businesses that are struggling today, according to the U.S. Department of Commerce, only 1 out of every 20 businesses becomes profitable and survives 10 years. There are many reasons for this statistic, but in this blog post I wanted to focus on just one of the reasons, the lack of a strategic plan. A strategic plan can be defined as the strategy and process a business will pursue in an effort to head in a specific direction.

There is a quote by Lewis Carroll that demonstrates the importance of having a specific direction, “If you don’t know where you are going, any road can take you there.” This is the way many entrepreneurs and business owners run their business, without a specific strategic plan for their company. As a result of not having a plan, they usually end up going through the motions of their daily operations until one day they are faced with an obstacle they did not foresee and is too great to overcome.

My goal is to help business owners realize the importance of setting a strategic plan for their company, followed by specific goals in order to push their company in the direction they desire. Through the use of key performance indicators (KPI) a business can measure their progress towards their goals. (I will write more about KPIs in a later blog post, so be sure to subscribe).

A strategic plan does not have to be complicated. You can start off with a simple plan that will lay out how the company will grow in the upcoming years. After you have a core plan in place, you can build on it by starting to include specifics pertaining to your product/service types, marketing strategy, etc. The important thing is to have a plan in place for you, your manager and employees to work toward so that everyone is on the same path. Once everyone in the organization is working on the same goals the business will continue to achieve new successes.

How to account for customer deposits using QuickBooks Online – QuickBooks Online Tutorial

This is a quick blog post describing how to account for customer deposits in QuickBooks. I have also made a YouTube video showing step by step instructions, followed by a example of accepting a customer deposit and later on invoicing that same customer.

Instructions for accepting a customer deposit

  1. Set up a new “Other Current Liabilities” account in your company file’s chart of accounts called “Customer Deposits.”
  2. Create a new product/service item in your item list called “Customer Deposit,” the income account associated with this item will be the Other current liability account we created in step 1.
  3. Accept a deposit from the customer or client using the Sales Receipt option under your customer center.
  4. Continue to filling out the sales receipt as usual and when choosing an item, choose the Customer Deposit item and input the amount of the deposit.

As always, if you have any questions or need any assistance please feel free to contact us at 954-358-9487 or fill the contact form below to have us contact you. I hope you have a wonderful day!

Microsoft Excel for Business – Payroll Modeling

Microsoft Excel is an extremely powerful tool that every business owner should have in his arsenal. Excel spreadsheets can be used in a number of different ways, some of which include;

  • Creating company budgets and cash flow forecasts
  • Keeping track of inventory
  • Basic business bookkeeping
  • Expense and Payroll Modeling

This list can go on almost indefinitely, but I will stop it right there for now. Looking over this with just a few examples of how you can use Excel in your business, it is easy to see how this software can be a great asset in formulating your business plan.

Please check out the video I made below showing how I used Microsoft Excel to create a payroll model for a specific business that pays the greater of an hourly rate or base commissions. I will be making more videos on other uses for Excel and business tips in general so please subscribe.

If you have any questions or comments please feel free to post them below or e-mail me at [email protected]. I hope you have a great day!